
Kahoot Solo-Spiel
https://kahoot.it/solo?quizId=3c60d2fc-c61f-4ef1-ab46-317dbd615c32

Wie professionell wirken Ihre E-Mails wirklich? Schon kleine Details bei Betreff, Anrede, Empfängern oder Anhängen können einen großen Unterschied machen. Entdecken Sie, wie Sie E-Mails klar strukturieren, typische Fehler vermeiden, Ihren Posteingang effizient organisieren und digitale Kommunikation im Berufsleben und bei Bewerbungen gezielt für Ihren Erfolg nutzen.
Hier findest du die Präsentation zum Thema mit allen wichtigen Informationen und Beispielen.
https://kahoot.it/solo?quizId=5d7949fe-a0a5-40b7-a241-2154591e65e8
Zum Üben der wichtigsten Begriffe stehen Ihnen verschiedene interaktive Lernspiele zur Verfügung.
Sie können nur die Flashcards öffnen oder die gesamte Playlist mit mehreren Übungen bearbeiten.
Mit den Flashcards lernen Sie die neuen Begriffe Schritt für Schritt kennen. Sie können die Karten in Ihrem eigenen Tempo durchgehen und sich mit den wichtigsten Wörtern und deren Bedeutung vertraut machen.
Diese Variante eignet sich besonders, wenn Sie die Wörter zum ersten Mal lernen oder kurz wiederholen möchten.
Die Playlist enthält mehrere verschiedene Übungen:
Jede Übung trainiert Ihr Gedächtnis auf eine andere Weise. Dadurch bleiben neue Wörter oft besser im Gedächtnis als beim reinen Lesen.
Unsere Empfehlung: Bearbeiten Sie zuerst die Flashcards und anschließend die komplette Playlist. So lernen Sie die Begriffe kennen, wiederholen sie spielerisch und überprüfen am Ende Ihren Lernerfolg.
Je abwechslungsreicher Sie lernen, desto besser kann sich Ihr Gehirn neue Informationen merken.
https://wordwall.net/playlist/1556
Nachdem Sie die Begriffe ausreichend geübt haben, versuchen Sie auch das Assignment.
Dort können Sie Ihr Wissen unter Zeitdruck testen und sehen, welchen Platz Sie auf der Rangliste erreichen.
Sie müssen dabei nicht Ihren echten Namen verwenden. Ein Spitzname oder ein beliebiger Benutzername ist völlig ausreichend.
Viel Erfolg und viel Spaß!

Wie sicher sind Sie wirklich im digitalen Alltag? Phishing-Mails, gefälschte Webseiten, unsichere Passwörter und Datenklau sind oft schwerer zu erkennen, als man denkt. Erfahren Sie, worauf Sie achten sollten, wie Sie typische Gefahren rechtzeitig erkennen und mit einfachen Maßnahmen sicherer im Internet und mit E-Mails umgehen.
Hier findest du die Präsentation zum Thema mit allen wichtigen Informationen und Beispielen.
https://kahoot.it/solo?quizId=3474ac37-8872-4fda-87b1-a80bd05962de
Zum Üben der wichtigsten Begriffe stehen Ihnen verschiedene interaktive Lernspiele zur Verfügung.
Sie können nur die Flashcards öffnen oder die gesamte Playlist mit mehreren Übungen bearbeiten.
Mit den Flashcards lernen Sie die neuen Begriffe Schritt für Schritt kennen. Sie können die Karten in Ihrem eigenen Tempo durchgehen und sich mit den wichtigsten Wörtern und deren Bedeutung vertraut machen.
Diese Variante eignet sich besonders, wenn Sie die Wörter zum ersten Mal lernen oder kurz wiederholen möchten.
Die Playlist enthält mehrere verschiedene Übungen:
🎡 Spin the Wheel – Begriffe zufällig auswählen und spielerisch wiederholen
🎁 Open the Box – Begriffe auf abwechslungsreiche Weise üben
❓ Quiz – Wissen überprüfen und den Lernerfolg testen
Jede Übung trainiert Ihr Gedächtnis auf eine andere Weise. Dadurch bleiben neue Wörter oft besser im Gedächtnis als beim reinen Lesen.
💡 Unsere Empfehlung: Bearbeiten Sie zuerst die Flashcards und anschließend die komplette Playlist. So lernen Sie die Begriffe kennen, wiederholen sie spielerisch und überprüfen am Ende Ihren Lernerfolg.
Je abwechslungsreicher Sie lernen, desto besser kann sich Ihr Gehirn neue Informationen merken.
https://wordwall.net/playlist/1554
Nachdem Sie die Begriffe ausreichend geübt haben, versuchen Sie auch das Assignment.
Dort können Sie Ihr Wissen unter Zeitdruck testen und sehen, welchen Platz Sie auf der Rangliste erreichen.
Sie müssen dabei nicht Ihren echten Namen verwenden. Ein Spitzname oder ein beliebiger Benutzername ist völlig ausreichend.
Viel Erfolg und viel Spaß!

Coordinated rotation of the shoulders and upper body is essential for an efficient freestyle stroke. If the shoulder movement is too limited, stiff, or out of sync with the arms, the recovery may become more difficult and unnecessary strain may be placed on the shoulder joint.
The following dryland exercise helps swimmers develop a feel for rhythmic shoulder movement while keeping the head stable. It consists of three progressive steps: first, only the shoulders move; next, the elbows are added; and finally, the complete freestyle arm action is simulated.
You will need a soft ball and either a stable wall or a narrow pillar.
Freestyle is not powered by the arms alone. Coordinated rotation of the shoulder girdle and upper body is also an important part of the stroke.
Proper shoulder rotation:
The goal is not to rotate the shoulders as far as possible. The movement should be relaxed, controlled, and continuous.
Place a soft ball between your forehead and a stable surface, then lean slightly forward. You can use a wall for the first two steps. A narrow pillar is more suitable for the third step because it allows the arm to move freely past it.
Hold the ball in place with your forehead without pressing it forcefully against the surface.
Keep your knees slightly bent and your torso stable. Distribute your weight evenly between both feet and choose a position that allows you to move your shoulders comfortably.
Throughout the exercise, remember to:
The ball provides immediate feedback. If your head moves too much, the ball will shift or fall.

Position the ball between your forehead and the wall. Keep both arms straight beside your body and allow them to hang down naturally. Do not support your hands on your thighs.
From this position, begin moving your shoulders alternately forward and backward in a steady rhythm. As one shoulder moves forward, the other moves slightly backward. Then change sides and continue the movement evenly.
The arms do not move independently during this step. They simply follow the movement of the shoulders while the elbows remain straight.
The purpose of this stage is to feel the alternating rhythm of the shoulders without performing an arm stroke.
Perform the exercise for 20–30 seconds, then take a short break.

Bend both elbows and place each hand on the shoulder on the same side. Your right hand should touch your right shoulder, and your left hand should touch your left shoulder. Do not cross your arms in front of your chest.
Allow the elbows to point outward and slightly forward. From this position, move the shoulders alternately forward and backward again.
As one shoulder moves forward, the elbow on the same side also moves slightly forward. At the same time, the opposite shoulder and elbow move backward. Then switch sides and continue in a steady rhythm.
The shorter arm position makes it easier to feel the rotation of the shoulder girdle during this step.
Perform this step for 20–30 seconds.

For the third step, place the ball against a stable, narrow pillar. The pillar should be narrow enough to allow one arm to extend freely past it.
Position the ball between your forehead and the pillar, then return to the same slightly forward-leaning stance with your knees bent.
Extend one arm fully forward on the far side of the pillar. Keep the arm long and straight and the hand relaxed. Bend the other arm, keeping its elbow high and moving the hand towards the torso, ribs, or hip.
This position imitates one moment of the freestyle stroke:
Slowly switch the positions of the arms. The previously extended arm bends while the other arm reaches forward past the pillar.
Perform the movements continuously but slowly. The aim is not speed, but coordination between the arm stroke, shoulder rotation, and stable head position.
Begin with 6–10 slow strokes on each side. If your technique remains controlled, gradually increase the number of repetitions.
A short practice block could be structured as follows:
The exercise can be included in a warm-up, a dryland training session, or performed immediately before technique work in the water.
One of the main purposes of the exercise is to develop a stable head position. If the ball moves or falls, slow down and return to the previous step if necessary.
Only the shoulders should move actively during the first step. The straight arms hang loosely beside the body and simply follow the movement of the shoulder girdle.
Lifting the shoulders towards the ears may create tension around the neck and shoulder girdle. Keep your neck relaxed and move the shoulders forward and backward.
Each hand should touch the shoulder on the same side. Do not cross your arms in front of your chest.
Choose a narrow pillar that allows you to extend your arm comfortably past it. Adjust the shoulder rotation and path of the arm so the movement remains unrestricted.
Swinging the arms independently does not create proper shoulder rotation. Think of the shoulder as initiating the forward reach, with the arm continuing that movement.
Rushing can hide technical errors. First develop the correct movement pattern slowly, then gradually increase the speed.
The ball is only a feedback tool. Do not press it forcefully against the surface, as this may create unnecessary tension in the neck.
The movement practised on land should ideally be transferred directly into the water. After completing the exercise sequence, swim a few easy lengths of freestyle while focusing on your technique.
In the water, pay attention to the following:
Do not try to copy the dryland movement rigidly in the water. During swimming, shoulder rotation forms part of a natural, coordinated movement involving the entire body.
This three-step dryland exercise helps connect a stable head position, rhythmic shoulder movement, and the freestyle arm stroke.
During the first step, the straight arms hang loosely beside the body while only the shoulders move. During the second step, each hand touches the shoulder on the same side. During the third step, the complete freestyle arm action is simulated beside a narrow pillar: one arm reaches forward while the other remains bent.
Only progress to the next step when the ball remains stable throughout the movement. Slow and precise execution is more important than speed or a high number of repetitions.
If you experience pain in your shoulder or neck during the exercise, stop and seek advice from a qualified coach or healthcare professional.
Für einen effizienten Armzug beim Kraulschwimmen ist eine koordinierte Rotation der Schultern und des Oberkörpers unerlässlich. Ist die Schulterbewegung zu klein, steif oder nicht auf den Rhythmus der Arme abgestimmt, wird das Vorführen des Armes erschwert und das Schultergelenk möglicherweise unnötig belastet.
Die folgende Übungsreihe an Land hilft dabei, die rhythmische Bewegung der Schultern bewusst wahrzunehmen, während der Kopf in einer stabilen Position bleibt. Die drei Schritte bauen aufeinander auf: Zuerst bewegen sich nur die Schultern, anschließend werden die Ellenbogen einbezogen und zum Schluss wird der vollständige Armzug des Kraulschwimmens nachgeahmt.
Für die Übungen benötigst du einen weichen Ball sowie eine stabile Wand oder eine schmale Säule.
Beim Kraulschwimmen arbeiten nicht nur die Arme. Auch die koordinierte Rotation des Schultergürtels und des Oberkörpers gehört zum Bewegungsablauf.
Eine gute Schulterrotation:
Das Ziel besteht nicht darin, die Schultern mit möglichst großem Bewegungsumfang zu drehen. Entscheidend ist eine lockere, kontrollierte und kontinuierliche Bewegung.
Platziere einen weichen Ball zwischen deiner Stirn und einer stabilen Fläche und neige den Oberkörper leicht nach vorn. Für die ersten beiden Schritte kannst du eine Wand verwenden. Für den dritten Schritt eignet sich eine schmale Säule besser, da sich der Arm dadurch frei an ihr vorbeiführen lässt.
Halte den Ball mit der Stirn an seinem Platz, ohne ihn kräftig gegen die Fläche zu drücken.
Die Knie sind leicht gebeugt und der Oberkörper bleibt stabil. Verteile dein Körpergewicht gleichmäßig auf beide Füße und wähle eine Position, in der du deine Schultern bequem bewegen kannst.
Achte während der gesamten Übung auf folgende Punkte:
Der Ball gibt dir eine unmittelbare Rückmeldung. Bewegt sich der Kopf zu stark, verrutscht der Ball oder fällt herunter.
Positioniere den Ball zwischen deiner Stirn und der Wand. Strecke beide Arme seitlich am Körper entlang und lasse sie locker nach unten hängen. Die Hände sollen sich nicht auf den Oberschenkeln abstützen.
Beginne aus dieser Position, die Schultern abwechselnd und rhythmisch nach vorn und hinten zu bewegen. Bewegt sich eine Schulter nach vorn, geht die andere leicht nach hinten. Wechsle anschließend die Seiten und führe die Bewegung in einem gleichmäßigen Rhythmus fort.
Die Arme führen in diesem Schritt keine eigenständige Bewegung aus. Sie folgen locker der Bewegung des Schultergürtels, während die Ellenbogen gestreckt bleiben.
Das Ziel besteht darin, die abwechselnde, rhythmische Bewegung der Schultern zunächst ohne Armzug wahrzunehmen.
Führe die Übung 20–30 Sekunden lang aus und mache anschließend eine kurze Pause.
Beuge beide Ellenbogen und lege jede Hand auf die gleichseitige Schulter. Die rechte Hand berührt die rechte Schulter, die linke Hand die linke Schulter. Die Arme werden vor dem Brustkorb nicht gekreuzt.
Die Ellenbogen zeigen nach außen und leicht nach vorn. Bewege die Schultern aus dieser Position erneut abwechselnd nach vorn und hinten.
Geht eine Schulter nach vorn, bewegt sich auch der gleichseitige Ellenbogen etwas nach vorn. Gleichzeitig gehen die andere Schulter und der andere Ellenbogen nach hinten. Wechsle anschließend die Seiten und setze die Bewegung in einem gleichmäßigen Rhythmus fort.
Durch die verkürzte Armposition lässt sich die Rotation des Schultergürtels in diesem Schritt noch deutlicher wahrnehmen.
Führe auch diesen Schritt 20–30 Sekunden lang aus.
Für den dritten Schritt platzierst du den Ball an einer stabilen, schmalen Säule. Die Säule sollte so schmal sein, dass du einen Arm ungehindert an ihr vorbeistrecken kannst.
Positioniere den Ball zwischen deiner Stirn und der Säule. Nimm anschließend wieder die leicht nach vorn geneigte Haltung mit gebeugten Knien ein.
Strecke einen Arm auf der gegenüberliegenden Seite der Säule vollständig nach vorn. Der Arm bleibt lang und gerade, während die Hand locker ist. Beuge den anderen Arm: Der Ellenbogen befindet sich in einer höheren Position, während sich die Hand in Richtung Oberkörper, Rippen oder Hüfte bewegt.
Diese Haltung imitiert einen bestimmten Moment des Kraul-Armzugs:
Tausche anschließend langsam die Position der Arme. Der zuvor gestreckte Arm wird gebeugt, während der andere Arm an der Säule vorbei nach vorn geführt wird.
Führe die Bewegungen flüssig, aber langsam aus. Es geht nicht um Geschwindigkeit, sondern um die Koordination von Armzug, Schulterrotation und stabiler Kopfhaltung.
Beginne mit 6–10 langsamen Armzügen pro Seite. Bleibt die Technik sauber, kannst du die Anzahl der Wiederholungen schrittweise erhöhen.
Eine kurze Übungseinheit kann folgendermaßen aufgebaut werden:
Die Übung eignet sich als Teil des Aufwärmens, für das Landtraining oder unmittelbar vor technischen Übungen im Wasser.
Eines der wichtigsten Ziele der Übung ist eine stabile Kopfhaltung. Bewegt sich der Ball oder fällt er herunter, verlangsame die Bewegung und kehre gegebenenfalls zum vorherigen Schritt zurück.
Im ersten Schritt werden nur die Schultern aktiv bewegt. Die gestreckten Arme hängen locker seitlich am Körper und folgen lediglich der Bewegung des Schultergürtels.
Zu den Ohren gezogene Schultern können Verspannungen im Nacken und Schultergürtel verursachen. Halte den Nacken locker und bewege die Schultern nach vorn und hinten.
Jede Hand berührt die gleichseitige Schulter. Die Arme dürfen vor dem Brustkorb nicht gekreuzt werden.
Wähle eine schmale Säule, an der du den Arm bequem vorbeistrecken kannst. Passe die Schulterrotation und die Bewegungsbahn des Armes so an, dass die Bewegung ungehindert bleibt.
Das eigenständige Schwingen der Arme ist noch keine korrekte Schulterrotation. Stelle dir vor, dass die Schulter die Vorwärtsbewegung einleitet und der Arm diese Bewegung fortsetzt.
Eine hektische Ausführung kann technische Fehler verdecken. Erlerne das richtige Bewegungsmuster zunächst langsam und erhöhe erst anschließend das Tempo.
Der Ball dient lediglich als Hilfsmittel für die direkte Rückmeldung. Drücke ihn nicht kräftig gegen die Fläche, da dadurch unnötige Spannung im Nacken entstehen kann.
Die an Land geübte Bewegung sollte möglichst direkt im Wasser ausprobiert werden. Schwimme nach der Übungsreihe einige lockere Bahnen Kraul und konzentriere dich dabei bewusst auf deine Technik.
Achte im Wasser auf folgende Punkte:
Versuche nicht, die Trockenübung im Wasser steif zu kopieren. Beim Schwimmen ist die Schulterrotation Teil einer natürlichen, koordinierten Bewegung des gesamten Körpers.
Diese dreistufige Trockenübung hilft dabei, eine stabile Kopfhaltung, eine rhythmische Schulterbewegung und den Armzug des Kraulschwimmens miteinander zu verbinden.
Im ersten Schritt hängen die gestreckten Arme locker seitlich am Körper, während ausschließlich die Schultern bewegt werden. Im zweiten Schritt berührt jede Hand die gleichseitige Schulter. Im dritten Schritt wird an einer schmalen Säule der vollständige Kraul-Armzug nachgeahmt: Ein Arm wird nach vorn gestreckt, während sich der andere in einer gebeugten Position befindet.
Gehe erst zum nächsten Schritt über, wenn der Ball während der gesamten Bewegung stabil bleibt. Eine langsame und präzise Ausführung ist wichtiger als Geschwindigkeit oder eine hohe Anzahl an Wiederholungen.
Wenn während der Übung Schmerzen in der Schulter oder im Nacken auftreten, brich die Bewegung ab und hole dir Unterstützung von einer qualifizierten Trainerin, einem qualifizierten Trainer oder einer medizinischen Fachkraft.
A hatékony gyorsúszó kartempóhoz elengedhetetlen a vállak és a törzs összehangolt elfordulása. Ha a vállmozgás túl kicsi, merev vagy nem követi a kartempó ritmusát, a kar nehezebben halad előre, és nagyobb terhelés kerülhet a vállízületre.
Az alábbi szárazföldi gyakorlatsor segít megérezni a vállak ritmikus mozgását, miközben a fej végig stabil helyzetben marad. A gyakorlat három egymásra épülő lépésből áll: először csak a vállakat mozgatjuk, majd bevonjuk a könyököt, végül a teljes gyorsúszó kartempót utánozzuk.
A gyakorláshoz egy puha labdára, valamint stabil falra vagy keskeny oszlopra lesz szükség.
Gyorsúszásnál nem csak a karok dolgoznak. A vállöv és a törzs összehangolt elfordulása is a mozgás része.
A megfelelő vállfordítás:
A cél nem a lehető legnagyobb elfordulás elérése, hanem egy laza, kontrollált és folyamatos mozgás kialakítása.
Helyezz egy puha labdát a homlokod és egy stabil felület közé, majd enyhén dőlj előre. Az első két lépéshez használhatsz falat, a harmadikhoz azonban egy keskeny oszlop praktikusabb, mert így a kar szabadon elfér mellette.
A labdát a homlokoddal tartsd a helyén, de ne nyomd erősen a felülethez.
A térdek legyenek enyhén hajlítva, a törzs pedig stabil. A testsúlyodat egyenletesen oszd el a két lábad között, és olyan testhelyzetet vegyél fel, amelyben kényelmesen tudod mozgatni a vállaidat.
A gyakorlat során végig figyelj a következőkre:
A labda azonnali visszajelzést ad. Ha a fej túlságosan elmozdul, a labda elgördül vagy leesik.
Helyezkedj el a labdával a homlokod és a fal között. A karokat nyújtsd ki a test mellett, és hagyd őket lazán lefelé lógni. A kezek ne támaszkodjanak a combokra.
Ebből a helyzetből kezdd el ritmikusan, felváltva előre és hátra mozgatni a vállakat. Amikor az egyik váll előrébb kerül, a másik kissé hátrafelé mozdul. Ezután cserélj oldalt, és folytasd egyenletes ritmusban.
A karok ebben a lépésben nem végeznek önálló mozgást. Lazán követik a vállöv mozdulatait, miközben a könyökök végig nyújtva maradnak.
Ennek a szakasznak az a célja, hogy a kartempó nélkül is megérezd a vállak váltakozó, ritmikus mozgását.
Végezd a gyakorlatot 20–30 másodpercig, majd pihenj röviden.
Hajlítsd be mindkét könyöködet, és helyezd a kezeidet a saját oldali válladra. A jobb kéz a jobb, a bal kéz a bal vállat érintse. A karok ne keresztezzék egymást a mellkas előtt.
A könyökök nézzenek kifelé és enyhén előre. Ebből a helyzetből ismét mozgasd a vállakat felváltva előre és hátra.
Amikor az egyik váll előremozdul, az azonos oldali könyök is kissé előrébb kerül. Ezzel egy időben a másik váll és könyök hátrafelé mozdul. Ezután cserélj oldalt, és folytasd a mozgást egyenletes ritmusban.
A rövidebb karhelyzet miatt ebben a lépésben még könnyebben érzékelhető a vállöv elfordulása.
Ezt a lépést is végezd 20–30 másodpercig.
A harmadik lépéshez helyezd át a labdát egy stabil, keskeny oszlophoz. Az oszlop legyen elég keskeny ahhoz, hogy az egyik karodat akadálytalanul előre tudd nyújtani mellette.
Helyezd a labdát a homlokod és az oszlop közé, majd vedd fel ugyanazt az enyhén előredöntött, hajlított térdű testhelyzetet.
Nyújtsd előre az egyik karodat az oszlop túloldalán. A kar legyen hosszú és egyenes, a kéz pedig maradjon laza. A másik kart hajlítsd be: a könyök kerüljön magasabb helyzetbe, a kéz pedig közelítsen a törzs, a bordák vagy a csípő vonalához.
Ez a testhelyzet a gyorsúszó kartempó egyik pillanatát utánozza:
Ezután lassan cseréld meg a karok helyzetét. Az előrenyújtott kar hajlított helyzetbe kerül, miközben a másik kar előrenyúlik az oszlop mellett.
A mozdulatokat folyamatosan, de lassan végezd. Ne a gyorsaságra törekedj, hanem a kartempó, a vállfordítás és a stabil fejtartás összehangolására.
Kezdetben végezz oldalanként 6–10 lassú kartempót. Ha a technika végig pontos marad, fokozatosan növelheted az ismétlések számát.
Egy rövid gyakorlóblokk a következőképpen épülhet fel:
A gyakorlat elvégezhető bemelegítés részeként, szárazföldi edzésen vagy közvetlenül a vízi technikai gyakorlás előtt.
A gyakorlat egyik fő célja a stabil fejtartás kialakítása. Ha a labda elmozdul vagy leesik, lassítsd le a mozgást, és szükség esetén térj vissza az előző lépéshez.
Az első lépésben csak a vállak mozognak aktívan. A nyújtott karok lazán lógnak a test mellett, és csupán követik a vállöv mozgását.
A fül felé emelt vállak feszültséget okozhatnak a nyak és a vállöv környékén. Tartsd lazán a nyakad, és a vállakat előre-hátra mozgasd.
Mindkét kéz a saját oldali vállat érintse. A karok ne keresztezzék egymást a mellkas előtt.
Olyan keskeny oszlopot válassz, amely mellett kényelmesen előre tudod nyújtani a karodat. A vállfordítást és a kar útját úgy állítsd be, hogy a mozgás akadálytalan maradjon.
A karok önálló lendítése még nem jelent megfelelő vállfordítást. Arra gondolj, hogy az előrenyúlást a váll indítja, a kar pedig ennek folytatásaként halad tovább.
A kapkodó mozgás elfedheti a technikai hibákat. Először lassan alakítsd ki a helyes mozgásmintát, és csak utána emeld a tempót.
A labda csupán visszajelző eszköz. Ne szorítsd erősen a felülethez, mert ez felesleges nyaki feszültséget okozhat.
A szárazföldön begyakorolt mozgást érdemes rögtön a vízben is kipróbálni. A gyakorlatsor után ússz néhány könnyű, technikára összpontosító hosszt gyorsúszásban.
Úszás közben figyelj a következőkre:
A szárazföldi mozdulatot ne próbáld mereven lemásolni. A vízben a vállfordítás a teljes test természetes és összehangolt mozgásának része.
Ez a háromlépcsős szárazföldi gyakorlat segít összekapcsolni a stabil fejtartást, a ritmikus vállmozgást és a gyorsúszó kartempót.
Az első lépésben a karok nyújtva, lazán lógnak a test mellett, és csak a vállakat mozgatjuk. A második lépésben mindkét kéz a saját oldali vállat érinti. A harmadik lépésben egy keskeny oszlop mellett már a teljes gyorsúszó kartempót utánozzuk: az egyik kar előrenyúlik, a másik pedig behajlított helyzetbe kerül.
Csak akkor lépj tovább a következő szintre, ha a labda végig stabilan a helyén marad. A pontos és lassú végrehajtás fontosabb, mint a gyorsaság vagy az ismétlések száma.
Ha a gyakorlat közben fájdalmat érzel a válladban vagy a nyakadban, hagyd abba a mozgást, és kérj segítséget szakképzett edzőtől vagy egészségügyi szakembertől.

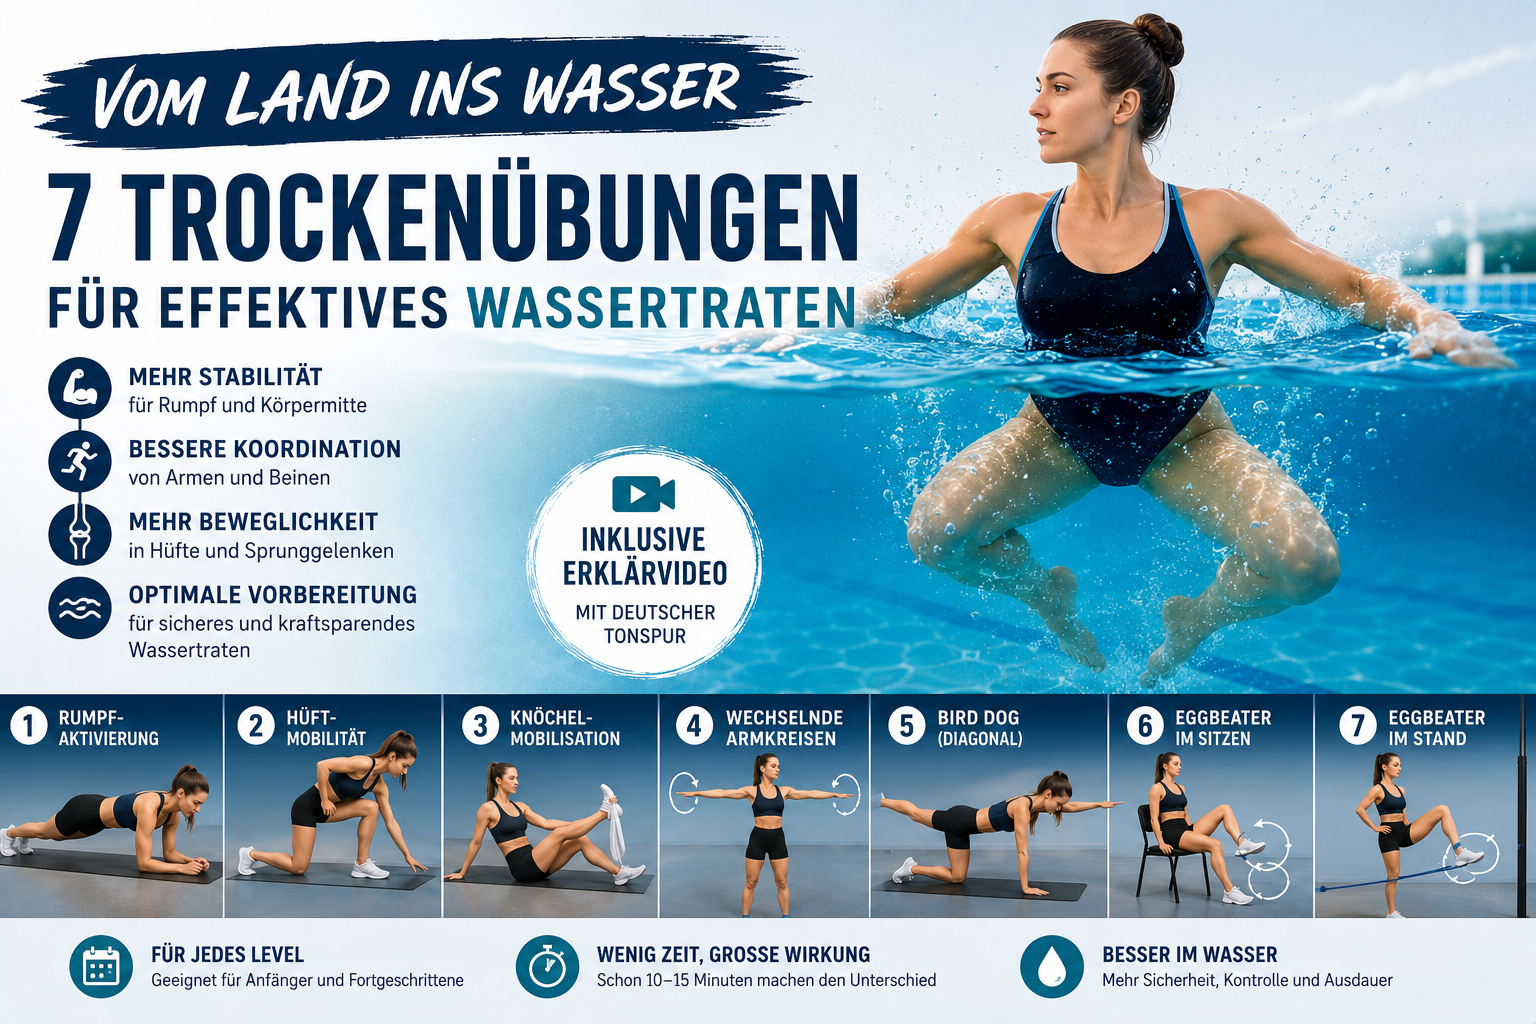
Treading water is one of the most important basic swimming skills. It allows you to remain safely and steadily at the surface without moving forward. This technique matters not only for beginners, but also for advanced swimmers, water polo players, artistic swimmers, lifeguards, and anyone who wants to feel secure in deep water.
Efficient treading water involves far more than correct leg action. A stable core, mobile hips and ankles, coordinated arm movements, and effective whole-body coordination are essential if the technique is to remain controlled and conserve energy.
That is exactly what this dryland program addresses. The seven exercises progressively improve the key physical foundations of successful treading water. You will train core stability, hip and ankle mobility, arm-leg coordination, and the specific eggbeater kick – first as separate components and then in movements that increasingly resemble the action in the water.
Each exercise builds on the one before it and prepares you for the next stage. In this way, you develop not only greater strength and mobility, but also a better feel for the movement involved in treading water.
Tip: At the end of the original article, you will also find a detailed explanatory video about treading
water. It demonstrates the technique step by step and includes a German audio track. This makes it
easier to connect the dryland exercises with the movement in the water.
Get into a high plank position with your hands directly under your shoulders. Your body should form a straight line from your head to your heels. Engage your core and glutes while keeping your back straight.
Keep your hips as stable as possible and avoid rocking your body from side to side. Breathe steadily throughout the entire exercise.
Recommendation: 10–15 repetitions per side or 30–45 seconds.
When treading water, your arms and legs move simultaneously while your upper body should remain as stable as possible. A strong core helps you maintain balance in the water, conserve energy, and coordinate the movements of your arms and legs more effectively.

Stand upright and shift your weight onto one leg. If necessary, lightly hold a wall or the back of a chair for support. Engage your core and keep your upper body as still as possible.
Make sure the movement comes from the hip joint, not from the knee or the back. Perform the circles slowly and precisely.
Recommendation: 10-15 circles in each direction on each leg.
The circular leg movements used in treading water originate mainly from the hips. Good hip mobility and control make the eggbeater technique easier, improve force transfer to the water, and allow you to tread water more calmly and efficiently.

Sit upright on a chair with both feet initially flat on the floor. Lift one foot slightly so that the lower leg can move freely. Keep your upper body upright and relaxed.
Try to use the ankle’s full range of motion. Keep the knee as still as possible – the movement should come entirely from the ankle.
Recommendation: 15-20 circles in each direction with each foot.
Why is this exercise important for treading water?
While treading water, the feet continually change position to generate as much pressure against the water as possible. Mobile ankles improve foot positioning in the water, make directional changes during the eggbeater kick easier, and provide more efficient force transfer with every circular movement.

Stand with your feet hip-width apart. Lengthen your upper body, draw your shoulders slightly back, and engage your abdominal muscles. Extend both arms out to the sides at shoulder height.
Keep your shoulders relaxed and let the movement come from the shoulder joints. Avoid arching your lower back or making unnecessary upper-body movements.
Recommendation: 20-30 seconds in each direction, for 2-3 rounds.
When treading water, small, steady arm movements support buoyancy and help maintain balance. This exercise improves shoulder mobility, develops coordination between the arms, and makes independent arm action easier – an important requirement for calm and efficient treading water.

Begin on all fours. Place your hands directly under your shoulders and your knees under your hips. Keep your back straight, look down, and align your neck with your spine. Lightly engage your abdominal and gluteal muscles.
Keep your pelvis level and do not let your back sag or round. Avoid jerky movements and continue breathing calmly throughout the exercise.
Recommendation: 10-15 repetitions per side.
During treading water, the arms and legs work simultaneously but often independently. Bird Dog improves core stability, balance, and coordination between opposite sides of the body. This makes it easier to control the arm action and eggbeater kick at the same time while keeping the body stable above the water.

Sit upright on a stable chair. Place both feet on the floor about hip-width apart and keep your torso straight. If necessary, lightly hold the seat or the edge of the chair so that you can focus fully on the leg action.
Keep your upper body as still as possible and do not let your pelvis rock from side to side. Focus on fluid circles rather than speed. Breathe calmly and evenly throughout the exercise.
Recommendation: 30-60 seconds per round, for 2-3 rounds.
This exercise reproduces the actual eggbeater leg action on land and prepares the body specifically for treading water. It improves coordination between the legs, hip and ankle mobility, and your feel for an even movement rhythm. The more confidently you master the action on land, the easier it will be to tread water calmly, steadily, and efficiently.
Starting position
Stand with your feet hip-width apart and your upper body upright. Lightly engage your abdominal and gluteal muscles and keep your shoulders relaxed. If you are using a resistance band, anchor it securely at ankle height and place the loop around one foot. Without a band, perform the exercise using body weight only.
Perform the circles slowly and precisely. Movement quality is more important than making large or fast circles. Breathe calmly and evenly throughout the exercise.
Recommendation: 10-15 circles in each direction on each leg, or 30-45 seconds per leg, for 2-3 rounds.
This exercise closely resembles the actual eggbeater action in the water. It improves hip strength, mobility, and coordination, as well as the stability of the standing leg. Optional resistance activates the muscle groups required for powerful and sustained treading water. At the same time, you develop a better feel for the circular leg action, making the transition from dryland practice to the water much easier.


TündisetundeEdit Profile
Das Wassertraten (engl. Tread Water) gehört zu den wichtigsten Grundfertigkeiten im Schwimmen. Es ermöglicht dir, dich ohne Vorwärtsbewegung sicher und kontrolliert an der Wasseroberfläche zu halten. Diese Technik ist nicht nur für Schwimmanfänger wichtig, sondern auch für fortgeschrittene Schwimmer, Wasserballspieler, Synchronschwimmer, Rettungsschwimmer und alle, die sich im tiefen Wasser sicher bewegen möchten.
Effizientes Wassertraten besteht aus weit mehr als nur der richtigen Beinbewegung. Eine stabile Körpermitte, bewegliche Hüft- und Sprunggelenke, koordinierte Armbewegungen und ein gutes Zusammenspiel des gesamten Körpers sind entscheidend, damit die Technik kraftsparend und kontrolliert funktioniert.
Genau hier setzt dieses Trockenprogramm an. Die sieben Übungen verbessern Schritt für Schritt die wichtigsten körperlichen Voraussetzungen für ein erfolgreiches Wassertraten. Du trainierst deine Rumpfstabilität, die Beweglichkeit deiner Hüften und Sprunggelenke, die Koordination von Armen und Beinen sowie die spezifische Eggbeater-Beinbewegung – zunächst einzeln und anschließend immer näher an der tatsächlichen Bewegung im Wasser.
Jede Übung baut auf der vorherigen auf und bereitet dich optimal auf die nächste Stufe vor. So entwickelst du nicht nur mehr Kraft und Beweglichkeit, sondern auch ein besseres Bewegungsgefühl für das Wassertraten.
Tipp: Am Ende dieses Beitrags findest du außerdem ein ausführliches Erklärvideo zum Wassertraten. Das Video zeigt die Technik Schritt für Schritt und ist zusätzlich mit einer deutschen Tonspur verfügbar. So kannst du die Trockenübungen direkt mit der Bewegung im Wasser verbinden und noch leichter lernen.
Gehe in die Liegestützposition. Die Hände befinden sich direkt unter den Schultern, der Körper bildet von Kopf bis Ferse eine gerade Linie. Spanne Bauch- und Gesäßmuskulatur an und halte den Rücken gerade.
Achte darauf, dass dein Becken möglichst ruhig bleibt und der Körper nicht von einer Seite zur anderen kippt. Atme während der gesamten Übung gleichmäßig weiter.
Empfehlung: 10–15 Wiederholungen pro Seite oder 30–45 Sekunden.
Beim Wassertraten bewegen sich Arme und Beine gleichzeitig, während der Oberkörper möglichst stabil bleiben sollte. Eine kräftige Rumpfmuskulatur hilft dabei, das Gleichgewicht im Wasser zu halten, Energie zu sparen und die Bewegungen der Arme und Beine besser zu koordinieren.

Stelle dich aufrecht hin und verlagere dein Gewicht auf ein Bein. Halte dich bei Bedarf leicht an einer Wand oder an einer Stuhllehne fest. Spanne deine Rumpfmuskulatur an und halte den Oberkörper möglichst ruhig.
Achte darauf, dass die Bewegung aus dem Hüftgelenk kommt und nicht aus dem Knie oder dem Rücken. Die Kreise sollten langsam und sauber ausgeführt werden.
Empfehlung: 10–15 Kreise pro Richtung und Bein.
Beim Wassertraten entstehen die kreisförmigen Bewegungen der Beine hauptsächlich aus der Hüfte. Eine gute Beweglichkeit und Kontrolle im Hüftgelenk erleichtern die Eggbeater-Technik (Wechselschlagtechnik), verbessern die Kraftübertragung auf das Wasser und ermöglichen ein ruhigeres, effizienteres Wassertraten.

Setze dich aufrecht auf einen Stuhl. Beide Füße stehen zunächst flach auf dem Boden. Hebe anschließend einen Fuß leicht an, sodass sich das Bein frei bewegen kann. Halte den Oberkörper aufrecht und entspannt.
Versuche, den gesamten Bewegungsumfang des Fußgelenks zu nutzen. Das Knie bleibt dabei möglichst ruhig – die Bewegung kommt ausschließlich aus dem Sprunggelenk.
Empfehlung: 15–20 Kreise pro Richtung und Fuß.
Beim Wassertraten verändern die Füße ständig ihre Stellung, um möglichst viel Druck gegen das Wasser aufzubauen. Ein bewegliches Sprunggelenk verbessert die Wasserlage der Füße, erleichtert die Richtungswechsel während der Eggbeater-Technik und sorgt für eine effizientere Kraftübertragung bei jeder Kreisbewegung.

Stelle dich hüftbreit hin. Richte den Oberkörper auf, ziehe die Schultern leicht nach hinten und spanne deine Bauchmuskulatur an. Strecke beide Arme seitlich auf Schulterhöhe aus.
Achte darauf, dass die Schultern entspannt bleiben und die Bewegung aus den Schultergelenken kommt. Vermeide ein Hohlkreuz oder unnötige Bewegungen des Oberkörpers.
Empfehlung: 20–30 Sekunden pro Richtung, 2–3 Durchgänge.
Beim Wassertraten unterstützen die Arme mit kleinen, gleichmäßigen Bewegungen die Auftriebskraft und helfen dabei, das Gleichgewicht zu halten. Diese Übung verbessert die Beweglichkeit der Schultern, fördert die Koordination beider Arme und erleichtert unabhängige Armbewegungen – eine wichtige Voraussetzung für ein ruhiges und effizientes Wassertraten.

Gehe in den Vierfüßlerstand. Die Hände befinden sich direkt unter den Schultern, die Knie unter den Hüften. Der Rücken bleibt gerade, der Blick ist nach unten gerichtet und der Nacken bildet eine Linie mit der Wirbelsäule. Spanne deine Bauch- und Gesäßmuskulatur leicht an.
Achte darauf, dass das Becken waagerecht bleibt und der Rücken weder durchhängt noch einen Rundrücken bildet. Vermeide ruckartige Bewegungen und atme während der gesamten Übung ruhig weiter.
Empfehlung: 10–15 Wiederholungen pro Seite.
Beim Wassertraten arbeiten Arme und Beine gleichzeitig, aber oft unabhängig voneinander. Der Bird Dog verbessert die Rumpfstabilität, das Gleichgewicht und die koordinierte Zusammenarbeit der gegenüberliegenden Körperseiten. Dadurch fällt es leichter, die Armbewegungen und die Eggbeater-Beinbewegung gleichzeitig kontrolliert auszuführen und den Körper stabil über Wasser zu halten.

Setze dich aufrecht auf einen stabilen Stuhl. Stelle beide Füße hüftbreit auf den Boden und halte den Oberkörper gerade. Greife bei Bedarf leicht an die Sitzfläche oder an die Stuhlkante, damit du dich ganz auf die Beinbewegung konzentrieren kannst.
Achte darauf, dass der Oberkörper möglichst ruhig bleibt und das Becken nicht hin- und herkippt. Konzentriere dich auf fließende Kreisbewegungen statt auf Geschwindigkeit. Atme während der gesamten Übung ruhig und gleichmäßig.
Empfehlung: 30–60 Sekunden pro Durchgang, 2–3 Durchgänge.
Diese Übung bildet die eigentliche Eggbeater-Beinbewegung an Land nach und bereitet den Körper gezielt auf das Wassertraten vor. Sie verbessert die Koordination beider Beine, die Beweglichkeit von Hüfte und Sprunggelenken sowie das Gefühl für den gleichmäßigen Bewegungsrhythmus. Je sicherer diese Bewegung an Land beherrscht wird, desto leichter fällt später ein ruhiges, stabiles und kraftsparendes Wassertraten im Wasser.

Stelle dich hüftbreit hin und richte den Oberkörper auf. Spanne deine Bauch- und Gesäßmuskulatur leicht an und halte die Schultern entspannt. Falls du ein Widerstandsband verwendest, befestige es an einem festen Punkt auf Knöchelhöhe und lege die Schlaufe um einen Fuß. Ohne Widerstandsband wird die Übung ausschließlich mit dem Eigengewicht ausgeführt.
Führe die Kreise langsam und sauber aus. Die Qualität der Bewegung ist wichtiger als große oder schnelle Kreise. Atme während der gesamten Übung ruhig und gleichmäßig.
Empfehlung: 10–15 Kreisbewegungen pro Richtung und Bein oder 30–45 Sekunden pro Bein, 2–3 Durchgänge.
Diese Übung kommt der tatsächlichen Eggbeater-Bewegung im Wasser besonders nahe. Sie verbessert die Kraft, Beweglichkeit und Koordination der Hüfte sowie die Stabilität des Standbeins. Durch den optionalen Widerstand werden genau die Muskelgruppen aktiviert, die für ein kraftvolles und ausdauerndes Wassertraten benötigt werden. Gleichzeitig entwickelt sich ein besseres Bewegungsgefühl für die kreisförmige Beinarbeit, was den Übergang vom Trockentraining ins Wasser deutlich erleichtert.

Zu dem folgenden Video gibt es auch eine deutsche Audiospur. Diese kannst du wie auf dem Bild gezeigt einstellen.
