Coordinated rotation of the shoulders and upper body is essential for an efficient freestyle stroke. If the shoulder movement is too limited, stiff, or out of sync with the arms, the recovery may become more difficult and unnecessary strain may be placed on the shoulder joint.
The following dryland exercise helps swimmers develop a feel for rhythmic shoulder movement while keeping the head stable. It consists of three progressive steps: first, only the shoulders move; next, the elbows are added; and finally, the complete freestyle arm action is simulated.
You will need a soft ball and either a stable wall or a narrow pillar.
Why is shoulder rotation important in freestyle?
Freestyle is not powered by the arms alone. Coordinated rotation of the shoulder girdle and upper body is also an important part of the stroke.
Proper shoulder rotation:
makes it easier to recover the arm over the water;
supports a longer and more natural stroke;
helps maintain an effective elbow position;
may reduce unnecessary stress on the shoulders;
contributes to a smooth and rhythmic swimming technique;
helps the swimmer keep the head stable.
The goal is not to rotate the shoulders as far as possible. The movement should be relaxed, controlled, and continuous.
Starting position
Place a soft ball between your forehead and a stable surface, then lean slightly forward. You can use a wall for the first two steps. A narrow pillar is more suitable for the third step because it allows the arm to move freely past it.
Hold the ball in place with your forehead without pressing it forcefully against the surface.
Keep your knees slightly bent and your torso stable. Distribute your weight evenly between both feet and choose a position that allows you to move your shoulders comfortably.
Throughout the exercise, remember to:
keep your head calm and stable;
prevent the ball from rolling from side to side;
avoid lifting or turning your head;
initiate the movement from the shoulder girdle;
keep your neck relaxed;
continue breathing normally;
perform every movement slowly and with control.
The ball provides immediate feedback. If your head moves too much, the ball will shift or fall.
Step 1: Shoulder movement with the arms hanging beside the body
Position the ball between your forehead and the wall. Keep both arms straight beside your body and allow them to hang down naturally. Do not support your hands on your thighs.
From this position, begin moving your shoulders alternately forward and backward in a steady rhythm. As one shoulder moves forward, the other moves slightly backward. Then change sides and continue the movement evenly.
The arms do not move independently during this step. They simply follow the movement of the shoulders while the elbows remain straight.
The purpose of this stage is to feel the alternating rhythm of the shoulders without performing an arm stroke.
What should you focus on?
Keep your arms beside your body.
Keep your elbows straight.
Do not lift your arms forward or out to the sides.
Do not swing your hands independently.
Avoid lifting your shoulders towards your ears.
Keep your head and the ball stable.
Make the movement continuous without rushing.
Perform the exercise for 20–30 seconds, then take a short break.
Step 2: Shoulder rotation with the hands on the shoulders
Bend both elbows and place each hand on the shoulder on the same side. Your right hand should touch your right shoulder, and your left hand should touch your left shoulder. Do not cross your arms in front of your chest.
Allow the elbows to point outward and slightly forward. From this position, move the shoulders alternately forward and backward again.
As one shoulder moves forward, the elbow on the same side also moves slightly forward. At the same time, the opposite shoulder and elbow move backward. Then switch sides and continue in a steady rhythm.
The shorter arm position makes it easier to feel the rotation of the shoulder girdle during this step.
What should you focus on?
Keep each hand on the shoulder on the same side.
Do not cross your arms.
Do not initiate the movement by swinging your elbows independently.
Do not turn your head towards the moving shoulder.
Keep your torso stable without becoming rigid.
Aim for a similar range of motion on both sides.
Perform this step for 20–30 seconds.
Step 3: Simulating the freestyle arm stroke
For the third step, place the ball against a stable, narrow pillar. The pillar should be narrow enough to allow one arm to extend freely past it.
Position the ball between your forehead and the pillar, then return to the same slightly forward-leaning stance with your knees bent.
Extend one arm fully forward on the far side of the pillar. Keep the arm long and straight and the hand relaxed. Bend the other arm, keeping its elbow high and moving the hand towards the torso, ribs, or hip.
This position imitates one moment of the freestyle stroke:
one arm is fully extended forward;
the other arm is bent;
the shoulders and upper body are rotated;
the head remains stable and still.
Slowly switch the positions of the arms. The previously extended arm bends while the other arm reaches forward past the pillar.
Perform the movements continuously but slowly. The aim is not speed, but coordination between the arm stroke, shoulder rotation, and stable head position.
What should you focus on?
Make sure the extended arm has enough room beside the pillar.
Do not allow the arm to strike the pillar.
Keep one arm fully extended while the other is bent.
Maintain a high elbow with the bent arm.
Allow the shoulder and arm to work together.
Reach forward fully without forcing the movement.
Keep your hands relaxed.
Do not turn your head with your shoulders.
Keep the ball stable throughout the movement.
Begin with 6–10 slow strokes on each side. If your technique remains controlled, gradually increase the number of repetitions.
Suggested exercise sequence
A short practice block could be structured as follows:
Shoulder movement with straight arms hanging beside the body: 20–30 seconds
Shoulder rotation with the hands on the shoulders: 20–30 seconds
Freestyle stroke simulation beside a narrow pillar: 6–10 repetitions per side
Short rest
Repeat the full sequence another 2–3 times
The exercise can be included in a warm-up, a dryland training session, or performed immediately before technique work in the water.
Common mistakes
The head moves with the shoulders
One of the main purposes of the exercise is to develop a stable head position. If the ball moves or falls, slow down and return to the previous step if necessary.
The arms swing during the first step
Only the shoulders should move actively during the first step. The straight arms hang loosely beside the body and simply follow the movement of the shoulder girdle.
The shoulders lift towards the ears
Lifting the shoulders towards the ears may create tension around the neck and shoulder girdle. Keep your neck relaxed and move the shoulders forward and backward.
The arms cross during the second step
Each hand should touch the shoulder on the same side. Do not cross your arms in front of your chest.
The arm strikes the pillar during the third step
Choose a narrow pillar that allows you to extend your arm comfortably past it. Adjust the shoulder rotation and path of the arm so the movement remains unrestricted.
Only the arms are moving
Swinging the arms independently does not create proper shoulder rotation. Think of the shoulder as initiating the forward reach, with the arm continuing that movement.
The exercise is performed too quickly
Rushing can hide technical errors. First develop the correct movement pattern slowly, then gradually increase the speed.
The ball is pressed too firmly
The ball is only a feedback tool. Do not press it forcefully against the surface, as this may create unnecessary tension in the neck.
How can you include the exercise in a swimming session?
The movement practised on land should ideally be transferred directly into the water. After completing the exercise sequence, swim a few easy lengths of freestyle while focusing on your technique.
In the water, pay attention to the following:
keep your head stable;
direct your gaze downward and slightly forward;
allow the shoulders to rotate alternately and rhythmically;
initiate the forward reach from the shoulder;
keep the arm recovery relaxed;
coordinate the rhythm of the arm stroke and shoulder rotation.
Do not try to copy the dryland movement rigidly in the water. During swimming, shoulder rotation forms part of a natural, coordinated movement involving the entire body.
Summary
This three-step dryland exercise helps connect a stable head position, rhythmic shoulder movement, and the freestyle arm stroke.
During the first step, the straight arms hang loosely beside the body while only the shoulders move. During the second step, each hand touches the shoulder on the same side. During the third step, the complete freestyle arm action is simulated beside a narrow pillar: one arm reaches forward while the other remains bent.
Only progress to the next step when the ball remains stable throughout the movement. Slow and precise execution is more important than speed or a high number of repetitions.
If you experience pain in your shoulder or neck during the exercise, stop and seek advice from a qualified coach or healthcare professional.
From land to water: build stability, mobility, coordination, and an efficient eggbeater kick
Treading water is one of the most important basic swimming skills. It allows you to remain safely and steadily at the surface without moving forward. This technique matters not only for beginners, but also for advanced swimmers, water polo players, artistic swimmers, lifeguards, and anyone who wants to feel secure in deep water.
Efficient treading water involves far more than correct leg action. A stable core, mobile hips and ankles, coordinated arm movements, and effective whole-body coordination are essential if the technique is to remain controlled and conserve energy.
That is exactly what this dryland program addresses. The seven exercises progressively improve the key physical foundations of successful treading water. You will train core stability, hip and ankle mobility, arm-leg coordination, and the specific eggbeater kick – first as separate components and then in movements that increasingly resemble the action in the water.
Each exercise builds on the one before it and prepares you for the next stage. In this way, you develop not only greater strength and mobility, but also a better feel for the movement involved in treading water.
Tip: At the end of the original article, you will also find a detailed explanatory video about treading water. It demonstrates the technique step by step and includes a German audio track. This makes it easier to connect the dryland exercises with the movement in the water.
Plank with Shoulder Taps
Starting Position
Get into a high plank position with your hands directly under your shoulders. Your body should form a straight line from your head to your heels. Engage your core and glutes while keeping your back straight.
How to Perform the Exercise
Slowly lift your right hand and tap your left shoulder.
Return your hand to the floor in a controlled manner.
Repeat the movement by lifting your left hand to tap your right shoulder.
Perform the exercise slowly and with control.
Keep your hips as stable as possible and avoid rocking your body from side to side. Breathe steadily throughout the entire exercise.
Recommendation: 10–15 repetitions per side or 30–45 seconds.
Why is this exercise important for treading water?
When treading water, your arms and legs move simultaneously while your upper body should remain as stable as possible. A strong core helps you maintain balance in the water, conserve energy, and coordinate the movements of your arms and legs more effectively.
Hip Circles While Standing on One Leg
Starting position
Stand upright and shift your weight onto one leg. If necessary, lightly hold a wall or the back of a chair for support. Engage your core and keep your upper body as still as possible.
How to do it
Lift the other foot slightly off the floor and bend the knee to about 90 degrees.
Slowly draw small circles from the hip with your knee.
Move the leg smoothly and with control, without rotating your upper body.
After the prescribed number of repetitions, reverse the direction, then switch legs.
Make sure the movement comes from the hip joint, not from the knee or the back. Perform the circles slowly and precisely.
Recommendation: 10-15 circles in each direction on each leg.
Why is this exercise important for treading water?
The circular leg movements used in treading water originate mainly from the hips. Good hip mobility and control make the eggbeater technique easier, improve force transfer to the water, and allow you to tread water more calmly and efficiently.
Seated Ankle Circles
Starting position
Sit upright on a chair with both feet initially flat on the floor. Lift one foot slightly so that the lower leg can move freely. Keep your upper body upright and relaxed.
How to do it
Extend the foot slightly forward.
Slowly rotate the ankle through a large circle.
Keep the movement smooth and controlled.
After the prescribed number of repetitions, reverse the direction.
Then repeat the exercise with the other foot.
Try to use the ankle’s full range of motion. Keep the knee as still as possible – the movement should come entirely from the ankle.
Recommendation: 15-20 circles in each direction with each foot.
Why is this exercise important for treading water?
While treading water, the feet continually change position to generate as much pressure against the water as possible. Mobile ankles improve foot positioning in the water, make directional changes during the eggbeater kick easier, and provide more efficient force transfer with every circular movement.
Alternating Arm Circles
Starting position
Stand with your feet hip-width apart. Lengthen your upper body, draw your shoulders slightly back, and engage your abdominal muscles. Extend both arms out to the sides at shoulder height.
How to do it
Begin making small forward circles with your right arm.
At the same time, circle your left arm backward.
Keep the movements smooth and even.
After 20-30 seconds, reverse the directions: circle your right arm backward and your left arm forward.
Breathe calmly and evenly throughout the exercise.
Keep your shoulders relaxed and let the movement come from the shoulder joints. Avoid arching your lower back or making unnecessary upper-body movements.
Recommendation: 20-30 seconds in each direction, for 2-3 rounds.
Why is this exercise important for treading water?
When treading water, small, steady arm movements support buoyancy and help maintain balance. This exercise improves shoulder mobility, develops coordination between the arms, and makes independent arm action easier – an important requirement for calm and efficient treading water.
Bird Dog (Opposite Arm and Leg Raise)
Starting position
Begin on all fours. Place your hands directly under your shoulders and your knees under your hips. Keep your back straight, look down, and align your neck with your spine. Lightly engage your abdominal and gluteal muscles.
How to do it
Slowly extend your right arm forward while extending your left leg backward.
Hold the position for 2-3 seconds without losing your balance.
Return the arm and leg to the starting position with control.
Repeat with your left arm and right leg.
Work slowly and with concentration. Quality is more important than speed.
Keep your pelvis level and do not let your back sag or round. Avoid jerky movements and continue breathing calmly throughout the exercise.
Recommendation: 10-15 repetitions per side.
Why is this exercise important for treading water?
During treading water, the arms and legs work simultaneously but often independently. Bird Dog improves core stability, balance, and coordination between opposite sides of the body. This makes it easier to control the arm action and eggbeater kick at the same time while keeping the body stable above the water.
Seated Eggbeater Kick
Starting position
Sit upright on a stable chair. Place both feet on the floor about hip-width apart and keep your torso straight. If necessary, lightly hold the seat or the edge of the chair so that you can focus fully on the leg action.
How to do it
Lift both feet slightly off the floor.
Begin the typical eggbeater action: as one leg makes a circular movement outward, downward, inward, and back upward, the other leg simultaneously moves through the opposing circle.
The legs work alternately and continuously – just as they will later in the water.
The movement comes mainly from the hips, while the knees and ankles follow loosely.
Make the circles small, smooth, and even. Try to maintain a steady rhythm.
After 30-60 seconds, you may optionally reverse the direction of both legs.
Keep your upper body as still as possible and do not let your pelvis rock from side to side. Focus on fluid circles rather than speed. Breathe calmly and evenly throughout the exercise.
Recommendation: 30-60 seconds per round, for 2-3 rounds.
Why is this exercise important for treading water?
This exercise reproduces the actual eggbeater leg action on land and prepares the body specifically for treading water. It improves coordination between the legs, hip and ankle mobility, and your feel for an even movement rhythm. The more confidently you master the action on land, the easier it will be to tread water calmly, steadily, and efficiently.
Standing Eggbeater (with a Resistance Band or Body Weight)
Starting position
Stand with your feet hip-width apart and your upper body upright. Lightly engage your abdominal and gluteal muscles and keep your shoulders relaxed. If you are using a resistance band, anchor it securely at ankle height and place the loop around one foot. Without a band, perform the exercise using body weight only.
How to do it
Lift one knee slightly so that the hip and knee form an angle of about 90 degrees.
With the lower leg raised, perform a controlled circular eggbeater movement. Let the action flow outward, downward, inward, and upward.
The movement comes mainly from the hip, while the knee and ankle support the circle.
Keep your upper body as still as possible and avoid compensating with other movements.
After the prescribed number of repetitions, switch legs.
With a resistance band, work against light resistance to activate the muscles more strongly.
Perform the circles slowly and precisely. Movement quality is more important than making large or fast circles. Breathe calmly and evenly throughout the exercise.
Recommendation: 10-15 circles in each direction on each leg, or 30-45 seconds per leg, for 2-3 rounds.
Why is this exercise important for treading water?
This exercise closely resembles the actual eggbeater action in the water. It improves hip strength, mobility, and coordination, as well as the stability of the standing leg. Optional resistance activates the muscle groups required for powerful and sustained treading water. At the same time, you develop a better feel for the circular leg action, making the transition from dryland practice to the water much easier.
Do you spend long hours at your desk wondering when you’ll ever find time to practice swimming? The good news is: you don’t always need an extra workout.
With a few simple exercises throughout the day, you can improve your core stability, ankle mobility, and leg strength – exactly the skills you need for a more efficient freestyle kick. At the same time, you’ll loosen up your body after sitting for hours and add more movement to your workday.
The following exercises are intentionally linked to common everyday situations. Whenever a certain word is mentioned or a specific event occurs, it automatically reminds you to perform a quick exercise. This way, movement gradually becomes a natural habit.
The suggested trigger words are just examples. Maybe people in your meetings constantly say „exactly,” „so,” „actually,” or „perfect” – or perhaps your colleagues have completely different favorite expressions. Simply choose a trigger that occurs frequently in your daily routine and connect it with one of the exercises. The more consistently you repeat these small movement breaks, the greater their long-term impact.
Tündi’s Tip: You don’t have to choose the same trigger words I did. Pick words or situations that naturally occur in your own work environment. The goal isn’t to perform every exercise perfectly—it’s to make them a regular part of your day. Small habits can make a surprisingly big difference, both in the office and in the pool.
„Exactly” Flutter Kicks
Trigger
Every time someone says „exactly” during a meeting or phone call.
Instructions
Sit upright in your chair.
Extend both legs slightly forward without letting your feet touch the floor.
Perform small, fast flutter kicks for about 10 seconds.
Initiate the movement from your hips while keeping your knees only slightly bent.
Keep your ankles relaxed and your toes pointed.
Breathe normally and keep the movement smooth and controlled.
What should you pay attention to?
Keep the kicks small and fast.
The movement should come from your hips, not your knees.
Keep your upper body as still and upright as possible.
The exercise should be discreet and shouldn’t interrupt your meeting.
Avoid holding your breath.
Goal of the exercise
This micro exercise improves the coordination and endurance of your freestyle kick. By linking the movement to the trigger word „exactly,” you’ll naturally build more movement into your workday—without setting aside extra training time.
Tündi’s Tip: Choose a word that comes up frequently in your meetings. Before long, an everyday expression will automatically remind you to improve your freestyle kick.
„So…” Toe Point Stretch
Trigger
Every time someone says „so…” during a meeting or phone call.
Instructions
Sit upright in your chair.
Place both feet flat on the floor.
Slowly point your toes downward, as if you were trying to push the floor away with the tops of your feet.
Hold the stretch for 5 seconds.
Relax your ankles completely.
Repeat the exercise every time you hear the word „so.”
What should you pay attention to?
The movement should come only from your ankles.
Point your toes deliberately downward (plantar flexion).
Keep your toes relaxed—don’t curl them.
Sit upright with relaxed shoulders.
Breathe calmly and naturally throughout the exercise.
Goal of the exercise
This micro exercise improves ankle mobility and body awareness. Good plantar flexion helps you create a more efficient freestyle kick by reducing drag and improving propulsion in the water. By linking the exercise to the trigger word „so,” it naturally becomes part of your workday.
Tündi’s Tip: The more often you hear the word „so,” the more opportunities you’ll have to improve your ankle flexibility. Small exercises performed consistently are often more effective than occasional long workouts.
„Actually” Core Activation
Trigger
Every time someone says „actually” during a meeting or phone call.
Instructions
Sit upright in your chair.
Place both feet flat on the floor.
Gently draw your belly button toward your spine without holding your breath.
Lightly engage your deep abdominal muscles and pelvic floor.
Hold the contraction for about 15 seconds.
Slowly release the tension while continuing to breathe normally.
Repeat the exercise every time you hear the word „actually.”
What should you pay attention to?
Breathe calmly and naturally throughout the exercise.
Engage your core gently—don’t suck your stomach in excessively.
Keep your shoulders relaxed.
Sit tall and avoid arching your lower back.
The contraction should be almost invisible from the outside.
Goal of the exercise
This micro exercise activates your deep core muscles, improves trunk stability, and supports better posture. A strong, well-coordinated core helps transfer force efficiently between your upper and lower body, contributing to a more stable body position and a more efficient freestyle stroke.
Tündi’s Tip: The word „actually” comes up surprisingly often in conversations and meetings. Use it as a reminder to activate your core. Over time, this simple habit will help your body maintain better stability both at your desk and in the water.
„Of Course” Ankle Circles
Trigger
Every time someone says „of course” during a meeting or phone call.
Change direction: When someone later says „perfect,” reverse the direction of the circles.
Instructions
Sit upright in your chair.
Lift both feet slightly off the floor.
Slowly rotate both ankles in the same direction at the same time.
Keep the movement smooth and controlled.
As soon as someone says „perfect,” reverse the direction.
Repeat the exercise every time you hear „of course” and switch directions whenever you hear „perfect.”
What should you pay attention to?
The movement should come only from your ankles.
Move both feet together in the same direction.
Keep your knees and thighs as still as possible.
Make slow, controlled circles with the largest comfortable range of motion.
Sit upright with relaxed shoulders.
Breathe calmly and naturally throughout the exercise.
Goal of the exercise
This micro exercise improves ankle mobility and helps you gain better control over your foot movements. Flexible, relaxed ankles make it easier to achieve good plantar flexion, resulting in a more efficient freestyle kick. It also promotes circulation and relieves stiffness caused by prolonged sitting.
Tündi’s Tip: Focus on making smooth, controlled circles rather than moving quickly. Every „of course” helps improve your ankle mobility, while every „perfect” reminds you to train both directions equally.
Coffee Break – Pelvic Floor Activation
Trigger
Every time you’re waiting for your coffee to brew.
Instructions
Stand upright with your weight evenly distributed on both feet.
Take a slow, relaxed breath in.
As you exhale, gently engage your pelvic floor, imagining that you’re lifting it slightly upward and inward.
Hold the contraction for about 5 seconds.
Fully relax your pelvic floor.
Repeat the exercise 5–8 times while your coffee is brewing.
What should you pay attention to?
Breathe calmly and naturally throughout the exercise.
Engage only your pelvic floor—keep your glutes, thighs, and abdominal muscles as relaxed as possible.
Avoid holding your breath or straining.
The movement should be almost invisible from the outside.
Goal of the exercise
This micro exercise strengthens your deep core stability, improves body awareness, and enhances the coordination between your pelvic floor, diaphragm, and deep abdominal muscles. A stable core helps transfer force more efficiently through your body, contributing to better body position and a stronger freestyle stroke.
Tündi’s Tip: Imagine your pelvic floor is an elevator. As you exhale, gently let the elevator travel upward. As you relax, let it slowly return to the ground floor. This simple visualization makes it much easier to activate—and fully relax—your pelvic floor correctly.
Fear of water is more common than many people think. It can range from mild discomfort in deep pools to intense anxiety, panic reactions, or complete avoidance of swimming, lakes, or the sea. Often, this fear is not caused by a lack of physical ability, but by emotional memories stored deep in the nervous system.
This is where Wingwave® coaching can be a powerful and gentle solution.
What Is Wingwave® Coaching?
Wingwave® coaching is a scientifically grounded, short-term coaching method that works with emotional stress, fears, and performance blocks. It combines elements from:
EMDR (Eye Movement Desensitization and Reprocessing)
Neuro-linguistic programming (NLP)
Kinesiology (muscle testing)
The method was developed to help the brain process emotional stress more efficiently—especially stress that the conscious mind already “knows” is irrational, but the body still reacts to automatically.
Why Fear of Water Is Often Emotional (Not Rational)
Many people with water fear say things like:
“I know the water is shallow, but my body panics.”
“I can’t control my breathing once I’m in the pool.”
“I freeze even though I logically know I’m safe.”
This happens because fear of water is often linked to:
A past frightening experience (near-drowning, slipping, being pushed into water)
A childhood memory (even very early, sometimes before verbal memory)
Observed fear (parents, teachers, or siblings expressing anxiety around water)
These memories are stored in the emotional brain (limbic system), not in logical thinking. Wingwave® coaching works exactly at this level.
How Wingwave® Helps with Fear of Water
1. Identifying the Emotional Trigger
Using a gentle muscle test, the coach identifies:
When the fear started
Which specific situation triggers it (deep water, face in water, loss of control, breathing, etc.)
Whether the fear is linked to a specific memory or emotional pattern
This step ensures the coaching is precise and not just “talk-based.”
2. Bilateral Stimulation (Wingwave Process)
The core of Wingwave® is bilateral stimulation, usually through guided eye movements (sometimes tapping or auditory stimuli).
This process:
Activates both brain hemispheres
Mimics natural REM sleep processing
Allows the brain to reprocess emotional memories safely
As a result, the emotional charge connected to water-related memories is reduced or fully neutralized.
3. Emotional Release Without Re-Traumatization
Unlike some methods, Wingwave® does not require reliving the traumatic situation in detail. Clients often report:
Resilience is the ability to stay balanced despite challenges, stress, or setbacks – or to emerge from difficult times even stronger.
It’s not an inborn trait, but a mindset we can develop and train – much like a muscle.
Resilient people don’t have fewer problems – they simply deal with them differently: flexibly, solution-oriented, and in connection with themselves and their surroundings.
The goal of this booklet
This booklet guides you step by step in strengthening your own psychological resilience – along the seven pillars of resilience:
Acceptance, Optimism, Solution Orientation, Self-Efficacy, Network Orientation, Future Planning & Sense of Purpose, and Self-Regulation.
Each pillar represents a vital competence that helps you:
handle stress more effectively,
respond more consciously to your thoughts and emotions,
and cultivate lasting calm and joy in your life.
How to use this booklet
Read the chapters in order, or intuitively choose the topic that speaks to you most right now.
Take your time with each exercise – even ten minutes can make a difference.
Record your thoughts, feelings, and insights in the booklet or a personal journal.
Repeat your favorite practices regularly – that’s how they become part of your everyday life.
This is not a test, but an invitation to meet yourself.
With every step, your confidence will grow – as will your ability to live with more calm, courage, and vitality.
The 7 Pillars of Resilience
Acceptance – I accept what I cannot change.
Optimism – I believe in a positive future.
Solution Orientation – I focus on what I can do.
Self-Efficacy – I take responsibility and trust in my actions.
Network Orientation – I reach out for support when I need it.
Future Planning & Sense of Purpose – I set goals that give my life meaning.
Self-Regulation – I take care of my thoughts, feelings, and energy.
1. Acceptance – I Acknowledge What I Cannot Change
Acceptance means recognizing that some things are beyond your control — and letting go of the struggle against them.
Instead of fighting reality, you allow the moment to be what it is.
Acceptance brings inner peace and frees your energy for what truly matters.
What’s in My Control?
Goal: To become aware of where your energy goes — and to consciously redirect it toward what you can truly influence.
Step: Connect with yourself Take a few deep breaths. Think of a situation that currently causes you stress or worry — maybe something at work, in your studies, relationships, or health.
Draw two columns:
Left column: “I can influence this.”
Right column: “This is beyond my control.”
Then answer these guided reflection questions:
For the left column – what you can influence:
What decisions can I personally make in this situation?
What habits, thoughts, or attitudes can I change?
Who can I reach out to for support?
What small, concrete step could I take today toward a solution?
For the right column – what’s beyond my control:
What is out of my hands, no matter how much I wish it were different?
Which things depend on other people’s choices or actions?
What circumstances are completely external to me?
What would happen if I allowed myself to let go of these?
Step: Reflect
Look at your two lists and ask yourself:
Where is my focus right now — on the left or the right?
How would my daily energy change if I spent 80% of it on the left side?
What’s the very first thing I can do today from my “influence” list?
If you’re a visual person, draw an energy circle 🎯 — write what you can control inside the circle, and place everything you can’t control outside of it. That’s your personal “Circle of Control.”
Letting-Go Meditation
Letting go does not mean giving up — it means freeing yourself from what you cannot control, so you can focus your energy on what truly matters.
This short meditation helps calm your nervous system, soften tension, and create emotional clarity.
How to practice the Letting-Go Meditation:
Take 5 quiet minutes for yourself.
Sit comfortably, close your eyes, and breathe slowly in and out.
With every exhale, say silently in your mind: “I release what I cannot change.”
Let this phrase wash gently through you.
With every breath out, imagine releasing a little more tension – worries, expectations, pressure, or mental clutter.
Why it works:
Pairing your breath with a calming inner mantra activates the parasympathetic nervous system, helping your body switch into a state of rest and recovery.
Your mind becomes clearer, your emotions soften, and your body relaxes.
Use this meditation in the morning to start fresh or in the evening to unwind.
Try practicing for a few days in a row and notice how your inner landscape slowly becomes calmer and lighter.
Stone Ritual
Hold a small stone and think of something that has been weighing on you.
Then place it down deliberately — as a symbol of release.
Reality Check
When you catch yourself worrying, pause and ask:
“Is this really true?”
You’ll often realize that stress comes from interpretation, not facts.
Grant me the serenity to accept the things I cannot change,
the courage to change the things I can,
and the wisdom to know the difference.
2. Optimism – I Believe in a Positive Future
Optimism is not about ignoring problems. It’s about choosing to focus on hope, learning, and possibilities.
When you see challenges as opportunities to grow, you stay motivated and creative — even in difficult times.
Three Good Things
Our brain has a built-in negativity bias – it remembers what went wrong more vividly than what went well.
But the good news is: you can re-train it to focus differently.
How it works:
Every evening, write down three things that went well today.
They don’t have to be big achievements –
maybe a friendly smile, a meaningful conversation,
a small success at work, or simply a beautiful thought that crossed your mind.
You can use a small notebook or your phone – the key is consistency, even on difficult days.
Why it works:
Over time, your brain learns to notice positive moments more quickly.
This exercise builds optimism, improves sleep, and enhances your overall sense of well-being.
Pair it with a calming ritual – a cup of tea, a soft playlist, or candlelight – so you end your day on a peaceful and grateful note.
What Can I Learn?
Challenges are an inevitable part of life.
But how we choose to respond determines whether we stay stuck — or grow stronger.
This exercise transforms difficult moments into opportunities for learning and personal development.
How it works
After you’ve experienced a difficult, uncomfortable, or emotionally charged situation, gently ask yourself:
“What did I learn from this?”
Take a moment to reflect honestly, without self-judgment. Then write down:
Which strength did this situation reveal in you?
What insight or realisation did you gain?
What new boundary, skill, or awareness emerged because of it?
These notes don’t have to be perfect or profound — the purpose is simply to help your mind shift from “Why did this happen to me?” to “How can this help me grow?”
Why it works
This simple reflective practice helps you:
reframe challenges as part of your growth,
recognise your inner resources,
reduce rumination,
and strengthen your long-term resilience.
Every time you identify a learning, your brain builds a new association: “Difficulty = Growth potential.”
Over time, setbacks feel less like failures and more like steps on your path.
Keep a small “Growth Journal.”
After each challenging moment, write one or two sentences beginning with:
“This taught me that…”
“Next time, I’ll try…”
“I discovered that I can…”
Looking back weeks or months later becomes a powerful reminder of how far you’ve come.
Reframing
When a negative thought appears (“I’ll never manage this”), reframe it to:
“I’m learning how to handle this.”
Gratitude Journal
Note one thing you’re thankful for each day.
Focusing on gratitude shifts attention from what’s missing to what’s abundant.
3. Solution Orientation – I Focus on What I Can Do
Instead of asking “Why did this happen?”, solution-oriented people ask,
“What can I do now?”
This mindset keeps you proactive, creative, and capable of finding the next small step forward.
The First Step
When facing a problem, we often see only the size of the challenge — and feel stuck.
But resilience isn’t about having all the answers.
It’s about recognizing the next step forward.
How it works:
When you’re in a difficult situation, ask yourself:
“What can I do next, concretely?”
You don’t need to see the whole path or final goal.
Just focus on the very first step.
Why it works:
Focusing on the next step makes things more manageable and reduces stress.
It helps you regain a sense of control and builds self-efficacy — one of the core pillars of resilience.
Write down your first step.
Once you’ve taken it, ask yourself again:
“What’s the next one now?”
Step by step, you’ll move forward — even on the days that feel heavy.
Unfiltered Brainstorm
When we struggle to find solutions, it’s rarely because we lack ideas —
but because our inner critic blocks them before they can even appear:
“That won’t work.”
“That’s unrealistic.”
“That’s too simple.”
“That’s stupid.”
Creativity can only unfold when evaluation and fear take a short break.
How to practice it
Set a timer for 10 minutes.
Write down every idea that comes to mind — no matter how small, big, wild, or strange.
Absolutely no judging:
no crossing out
no editing
no filtering
no explaining
no “that won’t work” thoughts
Just let ideas flow freely.
When the time is up, then you can look at your list and see which ideas are promising, creative, practical, or inspiring.
Why it works
This exercise helps you:
bypass your inner critic
unlock creative and intuitive thinking
reduce fear of failure
shift from perfectionism to possibility
discover new solutions you wouldn’t normally consider
It strengthens resilience by training mental flexibility and openness — two essential skills for problem-solving.
Use this method whenever you’re stuck on a decision, starting a new project, or feeling blocked.
Sometimes one “crazy” idea becomes the key to clarity, motivation, or the next breakthrough.
Solution Map
Draw your problem in the center and sketch all possible paths around it.
Seeing options visually reduces the feeling of being stuck.
Best-Case Scenario
Imagine your challenge resolved in the best possible way.
What did you do to get there?
Now turn those insights into actionable steps.
SMART Goal Setting
Turn your wish into a concrete plan:
Specific: What exactly do I want to do?
Measurable: How will I know I’m making progress?
Achievable: Is this realistic right now?
Relevant: Why is it meaningful for me?
Time-bound: By when will I achieve it?
Big changes begin with small, consistent steps.
4. Self-Efficacy – I Trust My Own Power to Act
Self-efficacy means believing that your actions make a difference.
It’s the opposite of helplessness.
You build it through small, consistent successes — not by waiting for confidence to appear.
Success Journal
Self-efficacy means believing in your own ability to make things happen.
Yet in everyday life, we often overlook our small wins – especially when we’re stressed, tired, or unsure of ourselves.
How it works:
Every evening, write down three things that went well or that you accomplished today.
They don’t have to be big achievements – even small moments count:
a clear conversation, a brave decision, a kind gesture, a thought you turned into action.
Use a small notebook or your notes app – what matters most is consistency.
You’re training your brain to notice progress and competence more consciously.
Why it works:
Over time, you’ll start to see more clearly what you already do well.
You’ll build trust in your own abilities – and strengthen your self-confidence, day by day.
At the end of each week, take a moment to read through your notes.
You’ll be surprised how much you’ve actually accomplished – even on days that felt like a struggle.
I Can Because…
List five situations you handled well and write why you succeeded.
This reminds you of your strengths and resources.
Skill Check
Name three things you’re good at — at work or in life — and use them intentionally this week.
Resilience Reflection
Think back to a hard time you overcame.
What helped you then? What can you apply again now?
Set an Independent Goal
Choose one small goal that depends only on you — a workout, a phone call, an organized space.
Every completed action strengthens your self-trust.
Resource Anchor
Pick a gesture, word, or small object that reminds you of your strength.
Practice linking it with a memory of calm or confidence.
Then use it in moments of stress to reconnect with that feeling.
Courage Check
Remember a moment when you acted even though you were afraid.
What were you afraid of?
What actually happened?
What did you gain from that courage?
Write your own courage mantra, such as:
“I don’t need to be perfect to be brave.”
“Courage begins where comfort ends.”
5. Network Orientation – I Reach Out and Stay Connected
Resilience grows in connection.
Strong relationships act like a safety net — they catch us when we fall and lift us when we need energy.
Support Network Map
Resilience doesn’t mean doing everything alone.
In fact, people with strong and caring connections recover faster from stress, setbacks, and crises.
How it works:
Draw a simple network diagram:
In the center, write your own name.
Around you, note the people you can rely on in different situations – family, friends, colleagues, mentors, neighbors, or even online communities.
Add a few words describing how each person supports you:
Do they listen? Offer advice? Bring laughter or structure into your day?
Why it works:
This exercise helps you realize that you’re not alone –
and it also highlights where your strongest connections are,
and where new ones might still grow.
Review your support network from time to time.
Ask yourself: Who gives me strength right now?
Who might need my support in return?
Resilience is built together, not in isolation.
Reconnect
Contact three people you haven’t spoken to in a while — a message, a call, a coffee.
Small gestures keep bonds alive.
Gratitude Message
Thank someone who recently supported or inspired you.
Expressed appreciation strengthens both sides.
Buddy System
Find a “resilience buddy” — someone with similar goals.
Meet weekly, share progress, and set one small goal for the next week.
Encourage and celebrate each other.
Build Your Digital Network
Keep your online presence authentic and active.
Update your profile, reach out to new people, join groups that inspire you, and interact with kindness.
Networking isn’t about collecting contacts — it’s about creating meaningful exchange.
When we grow together, we grow stronger.
6. Future Planning & Sense of Purpose – I Know My Why
Purpose gives direction and motivation, especially in uncertain times.
When you know what truly matters to you, decisions become easier and energy flows more freely.
Vision Board
Future orientation means having a clear sense of where you want to go — professionally, personally, and emotionally.
A Vision Board helps you make that direction visible, tangible, and motivating.
How it works:
Create a collage using images, words, colors, or symbols that represent your goals and dreams for the next 1–5 years.
You can use magazine clippings, a digital canvas, or draw elements yourself — anything that feels inspiring.
Reflect on questions like:
What do I want to achieve in my career?
What kind of personal life do I want to build?
Which feelings do I want more of in my everyday life?
What new skills, qualities, or relationships would I like to develop?
Why it works:
Visualization activates your brain in a powerful way.
When you keep your dreams in sight, you’re more likely to take small, steady steps toward them.
It aligns your inner compass with what truly matters to you.
Place your Vision Board somewhere visible — above your desk, on your wardrobe door, or as your digital wallpaper.
Update it once a year and celebrate the goals you’ve already reached.
Mini Mission Statement
Write one powerful sentence that defines what you stand for and what drives you.
Examples:
“I help others believe in themselves.”
“I bring structure and heart together.”
“I stand for clarity, courage, and movement.”
My Core Values
List your five most important values (e.g. honesty, creativity, freedom, learning, connection).
Next to each, write one way you can live that value daily.
Life Line
Draw a line showing your life’s path — with highs, lows, and turning points.
Mark what each phase taught you.
You’ll see that even difficult times shaped your strength.
Letter to My Future Self
Write to yourself one year from now.
Describe where you want to be, how you want to feel, and what you hope to have learned.
Read it later — you’ll be amazed at your growth.
Future Wheel
Reflect on your ideal work life:
Where do I work?
What do I do?
Who do I work with?
How do I feel?
What values guide me? Your answers show what kind of environment truly suits you.
Find Meaning Through Action
Purpose often comes from doing, not thinking.
Volunteer, mentor, create — and notice what makes you feel alive.
Even small contributions can bring big meaning.
Finding Meaning Through Volunteering
Contributing to something bigger than yourself gives life purpose and energy.
Volunteering helps you feel useful, connected, and empowered — three key elements of resilience.
Even small acts of service can strengthen your sense of meaning and self-worth.
Try This
Reflect: What matters most to you? Think about causes or communities that touch your heart — the environment, education, animals, social justice, inclusion, or culture. Your volunteer work should match your personal values.
Start small. Look for one concrete way to get involved — online or locally:
Join a neighborhood or community project
Offer mentoring or tutoring
Help organize a cleanup or donation drive
Support a school, elderly center, or charity association
Even a few hours a month can make a difference.
Notice what you gain. Ask yourself:
What skills do I use or develop while helping?
Who do I meet or connect with?
How do I feel afterwards?
Make it part of your life. Think about how you can keep volunteering sustainably — through regular small actions, monthly events, or spontaneous help.
Reflection
When do I feel truly useful?
What does my engagement have to do with my “why”?
What do I learn about myself when I help others?
Meaning is often found not through thinking — but through doing.
Try something new, observe how it feels, and let yourself be surprised by the impact you can create.
Find your rhythm. Track your progress. Fall in love with learning.
Why You Need a Language Planner
Learning a new language is not just about memorizing words — it’s about building a relationship with the language. Most learners struggle not because they lack motivation, but because they lack structure. A Language Learning Planner gives your study routine shape, direction, and purpose.
It helps you:
clarify why you’re learning,
define what to focus on,
and track how far you’ve come.
Whether you’re learning alone, with a teacher, or through an app, this planner turns scattered practice into a clear learning journey.
Who Is It For?
This planner is for anyone who wants to learn smarter, not harder. It works beautifully for:
Independent learners — who need accountability and structure.
Language teachers & coaches — who want to guide students through goal-setting.
Students & exam-takers — preparing for language tests or study abroad.
Travellers & expats — who want to feel more confident in daily situations.
Lifelong learners — who see language as a way to grow personally and culturally.
How to Use It Step by Step
Start with Motivation
Before jumping into grammar, take time to reflect. Ask yourself: Why do I want to learn this language? Fill out the Motivation & Identity pages — these questions will ground your “why” and remind you of it later when energy fades.
This section only needs to be filled out once (but you can revisit it anytime).
Map Out Your Priorities
Use the Learning Priorities section to list the most relevant topics and skills for your life — travel, work, food, daily routines, etc. It helps you decide what’s urgent versus what’s nice to have.
Write your priorities on small sticky notes and rearrange them as your focus changes.
Turn Priorities into SMART Goals
Use the SMART Goal Builder to transform your ideas into clear, achievable targets. Each goal includes:
your motivation,
measurable outcome,
start and end date,
obstacles and resources,
and an action plan.
This is a great page to print out separately and keep visible — on your desk, mirror, or inside your notebook. (You can reuse this template for every new goal — one per skill or topic.)
Build Habits That Stick
Small, consistent steps beat long study marathons.
That’s where the Habit Tracker comes in.
Choose 4–6 habits, and mark how often you want to do each one (daily, 2x/week, weekly, monthly).
Creative ideas:
Use color codes for each skill: 🟢 Listening, 🔵 Speaking, 🟣 Writing, 🟠 Reading.
Add stickers or stars for completed weeks — visual motivation works wonders!
If you prefer old-school style, simply rate yourself with grades or percentages.
The Monthly Habit Tracker is also best printed — so you can fill it in by hand and actually see your progress grow.
Reflect Weekly
Every week, fill in your Weekly Reflection page:
“What did I learn?”
“What was hard?”
“What made me proud?”
These mini check-ins help you celebrate small wins and adjust what’s not working. Think of them as your language diary, not just a form.
Review Monthly
At the end of each month, complete your Monthly Review and Milestone Map.
You’ll start seeing patterns — which skills you practiced most, which still need love, and how your confidence grows.
Give yourself a monthly badge or title – like “Grammar Explorer”, “Pronunciation Hero”, or “Fearless Speaker.”
A playful reward system keeps the process light and fun.
What to Print and What to Keep Digital
Section
Recommended Format
Frequency
Motivation & Identity
Fill once in PDF
One-time setup
Learning Priorities
Fill once or update digitally
Every few months
SMART Goal Builder
Print for each new goal
Monthly or per topic
Habit Tracker
Print monthly
1 per month
Weekly Reflection
Digital or print (your choice)
Monthly
Monthly Review & Milestone Map
Print for long-term overview
Monthly or quarterly
Final Thought
Your Language Learning Planner is not just a document — it’s your travel companion on the road to fluency. Some days you’ll fill it neatly, other days you’ll just doodle a word or star — and that’s perfectly fine.
Consistency matters more than perfection. Celebrate each page you fill, each word you write, and each box you tick. Because every mark is proof that you’re learning, growing, and connecting.
When you’re between jobs, it’s easy to feel like you’re stuck in limbo — waiting, refreshing job boards, tweaking your resume for the 47th time. But what if there were a way to keep growing, even before your next job offer?
Enter: Volunteering.
It’s not just about giving back — it’s a way to move forward.
Here are 7 powerful reasons why volunteering while job hunting might be the smartest move you can make:
1. Learn by doing
Volunteering gives you hands-on experience — especially valuable if you’re a recent graduate, career changer, or returning to the workforce. It allows you to build real skills in real environments, not just on paper.
2. Practice the language
If you’ve relocated to a new country or are improving your language skills, volunteering is a low-pressure way to practice. You gain confidence, fluency, and cultural awareness — all while doing something meaningful.
3. Build real connections
Volunteering puts you in touch with professionals who share your values. These authentic connections often turn into lasting networks — and sometimes even job leads — without the awkwardness of forced networking events.
4. Explore your path
Not sure if you’re heading in the right direction? Volunteering lets you test different roles or fields before fully committing. Think of it as career prototyping — try first, decide later.
5. Fill the gap with purpose
Recruiters notice when you’ve used your time well. A volunteer role shows you’re active, curious, and committed — even when you’re not officially employed. It fills gaps with value, not just time.
6. Boost your mental health
Job searching can be draining. Volunteering offers structure, purpose, and community, all of which support your mental well-being. Helping others is a powerful way to regain perspective and stay grounded.
7. It might lead to a job
Yes, really. Many organizations hire from within their volunteer base, because those people have already shown initiative, commitment, and cultural fit. Several volunteers I’ve coached were hired this way — no application needed.
Volunteering = Growth
Volunteering isn’t just about giving your time — it’s about investing in your future self. It helps you stay sharp, stay visible, and stay motivated.
Have you volunteered while job hunting?
What did you learn — or gain — from the experience?
Share your thoughts with me! And if you’re not sure where to start, reach out. I’m happy to connect you with ideas or platforms.
Volunteering Options
Imagine – Online If you’re someone who believes in meaningful work, human potential, and the power of giving back — volunteering as a career coach or mentor at Imagine might be one of the most rewarding steps you can take.
Imagine – Online
If you’re someone who believes in meaningful work, human potential, and the power of giving back — volunteering as a career coach or mentor at Imagine might be one of the most rewarding steps you can take.
Who is it for?
Experienced professionals
If you’ve spent years navigating the job market, leading teams, or growing in your career — your perspective is invaluable. You can offer insights that no textbook or webinar can match.
HR, recruiting, and coaching professionals
Your practical knowledge of CV reviews, interviews, and hiring trends could be life-changing for someone trying to break into the European job market.
Career changers or new coaches
Volunteering at Imagine is a great way to gain real-world coaching experience, test your skills, and build confidence in a low-pressure, high-impact setting.
Expats and multilingual professionals
If you’ve successfully adapted to a new culture, job market, or language — you already have hard-won knowledge others are searching for. You’ve walked the path they’re just beginning.
Why become a mentor?
1. Make a real impact — fast.
Imagine works with job seekers (“Fellows”) who are highly motivated and often facing systemic barriers to employment. Your guidance could be the breakthrough they need.
2. One session makes a difference.
Even a single 30-minute conversation — giving feedback on a CV or LinkedIn profile — can open up a new perspective or opportunity.
3. Grow your coaching skills.
You’ll learn to coach across cultures, languages, and backgrounds — while practicing deep listening, empathy, and structured feedback.
4. Join a purpose-driven global community.
Imagine isn’t just a platform — it’s a network of values-aligned people who believe in inclusion, dignity, and helping others rise.
5. It feels good.
Supporting someone’s growth, confidence, or job search momentum is not just “nice” — it’s energizing, humbling, and deeply fulfilling.
A few things to know:
You choose your level of involvement (even one session is helpful)
All coaching happens online
Imagine supports mentors with structure and optional training
No long-term commitment required — but many choose to stay
United Planet – Virtual Volunteering & Internships Make global impact from wherever you are. United Planet offers virtual volunteering and internship programs that connect people across borders to collaborate on real-world projects that make a difference. Whether you’re a student, young professional, or seasoned expert — this is a unique chance to apply your skills meaningfully, develop professionally, and support community-based organizations around the world.
United Planet – Virtual Volunteering & Internships
Make global impact from wherever you are.
United Planet offers virtual volunteering and internship programs that connect people across borders to collaborate on real-world projects that make a difference. Whether you’re a student, young professional, or seasoned expert — this is a unique chance to apply your skills meaningfully, develop professionally, and support community-based organizations around the world.
Who is it for?
United Planet is a great fit for:
Students looking for international experience or credit-bearing internships
Young professionals seeking career clarity, skill-building, or a global network
Career changers or retirees who want to contribute expertise to global challenges
Anyone passionate about social impact, global citizenship, and intercultural exchange
Why join as a virtual volunteer?
Gain international experience without travel costs or visa hurdles
Build your resume while supporting education, health, sustainability, or youth initiatives
Collaborate with global NGOs and community projects
Flexible time commitment — you choose the intensity and duration
Personalized matching based on your skills, interests, and goals
Communications, content creation, and social media
Fundraising and project development
Marketing, research, translation
Organizational support for NGOs and schools
Why United Planet?
With 20+ years of experience and partnerships in 30+ countries, United Planet is recognized for responsible volunteering, deep cultural engagement, and personalized support.
You’ll not only make a difference — you’ll also gain insight, confidence, and a stronger global mindset.Choose fully remote, flexible opportunities
ReDI School – Germany By volunteering with ReDI, you’ll help people break through barriers and build futures through tech.
ReDI School Germany – Volunteer with Purpose in Tech Education
Empower through education. Create opportunity through code.
ReDI School of Digital Integration is a nonprofit tech school in Germany that connects refugees, migrants, and underserved communities with free digital education and strong career networks — and they’re powered by an incredible community of volunteers.
By volunteering with ReDI, you’ll help people break through barriers and build futures through tech.
Who is it for?
ReDI is a perfect fit for:
Tech professionals & developers who want to share their skills for social good
Mentors & coaches who enjoy guiding and uplifting others
Students or career changers looking to gain hands-on experience while contributing
Anyone passionate about inclusion, diversity, and education in tech
Why volunteer with ReDI?
Make a direct impact by helping students gain tech skills, confidence, and job-readiness
Join an international, values-driven community that believes in empowerment through education
Improve your teaching, mentoring, and communication skills
Build meaningful relationships with students, teachers, and industry professionals
Enhance your CV with purpose-driven experience in a respected European nonprofit
Give back using what you already know — no teaching degree required
Volunteer roles include:
Teaching coding, UX/UI design, data science, or digital skills
Mentoring students one-on-one
Supporting career readiness & mock interviews
Helping with community-building events and workshops
ReDI offers flexible options — you can volunteer in person in Germany (Berlin, Munich, etc.) or remotely for certain programs.
Discover Volunteer Opportunities in Munich
Visit the Münchner FreiwilligenMesse (Munich Volunteer Fair)
Are you living in or near Munich and thinking about volunteering?
Looking for meaningful ways to give back, grow your skills, or connect with your community?
Then the Münchner FreiwilligenMesse is the place to be.
Next event:
🗓 March 15, 2026
Altes und Neues Rathaus, Marienplatz, Munich
Who should attend?
Anyone curious about volunteering — from one-time actions to long-term engagement
Newcomers looking to integrate and contribute in Munich
Students and career changers seeking purpose-driven experience
Retirees or professionals with time and skills to share
Creative, tech, or admin-savvy individuals wanting to support local causes
Why it’s worth visiting:
Get matched with an opportunity that fits your time, skills, and interests
Meet over 50 local organizations and initiatives looking for volunteers
Discover a wide range of causes: education, environment, culture, social work, health, and more
Attend talks, info sessions, and hands-on activities
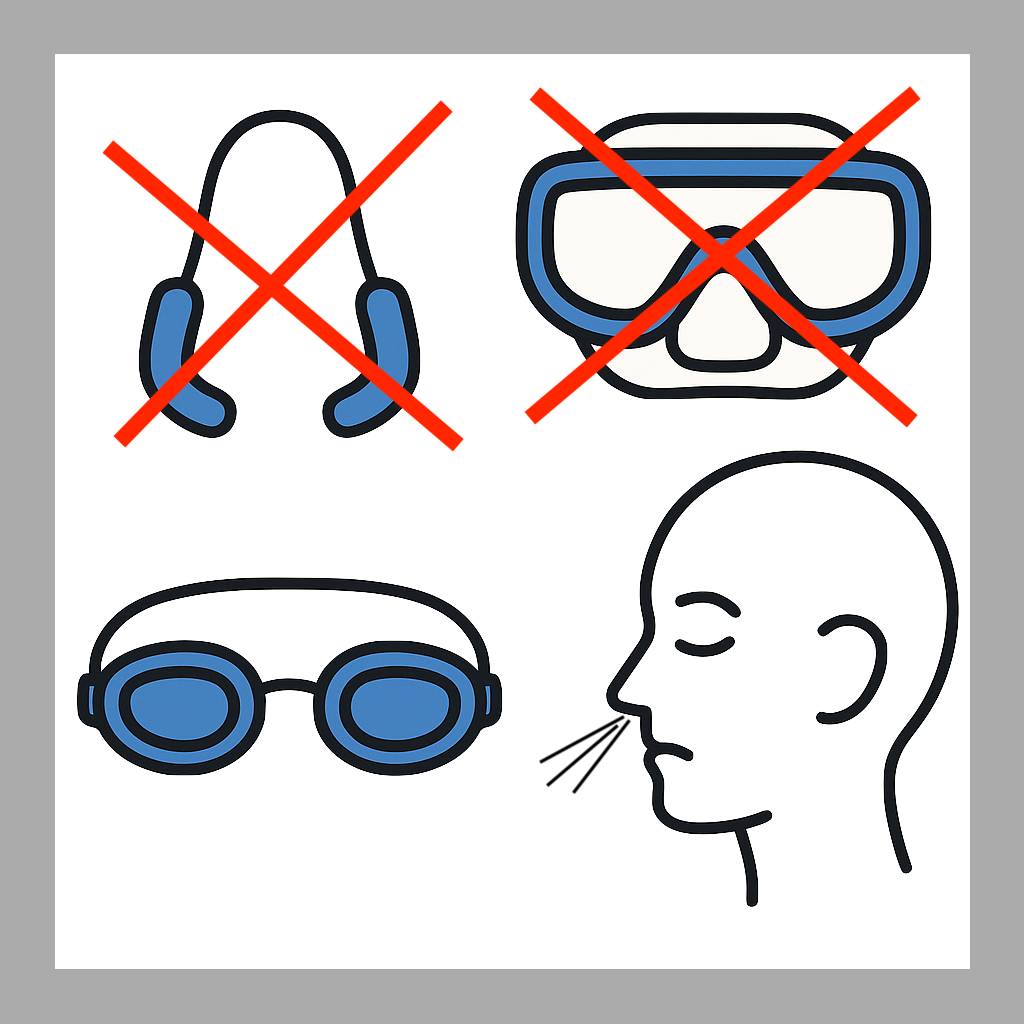
Many children learning to swim wear nose clips or full-face goggles that cover the nose. At first glance, these seem helpful — they prevent water from entering the nose, making submersion more comfortable. But are they really supporting learning? Or are they delaying a key part of water adaptation: learning to exhale through the nose?
Let me share the story of one of my students.
A Brave Step Forward — With a Simple Pair of Goggles
Today I worked with an 8-year-old beginner. She was afraid to put her nose in the water. It was clear this wasn’t just hesitation — most likely, a previous negative experience had left a lasting impression. There’s no time during a swim lesson to fully unpack a child’s past, but we can move forward gently, step by step.
During today’s session, for the first time, she dipped her nose into the water and managed to exhale slowly through it. She kept her eyes open and focused — reading the number I showed her with my fingers under the water. She was wearing standard goggles that left her nose uncovered. And it worked.
She was cautious, but in control.
When Equipment Becomes a Crutch
Later, we switched to a game: drop the rubber octopus toy deeper into the pool so it floats up in a zig-zag. The deeper the drop, the more fun. For this, she switched to her full-face goggles — the kind that cover the nose entirely. She held the mask tightly with one hand to prevent water from leaking in, while trying to release the toy with the other.
At one point, the mask shifted.
Water rushed in, and she surfaced coughing, panicked and struggling to catch her breath.
She knows how to exhale through her nose now. She can stay calm. But because the mask had taught her to ignore her nose — to rely on it being sealed — she didn’t use the new reflex. In that moment of surprise, she panicked. Her instinct was still to inhale through the nose.
And that’s exactly the problem.
Why This Matters
As long as a child wears a nose clip or a mask that covers the nose, they never have to learn the most basic aquatic reflex: only exhale through the nose underwater.
With a standard goggle, the child can only submerge as long as they can confidently exhale — and that’s a good thing. They remain connected to their body and breath. They build awareness, control, and trust.
But full-face masks remove that self-regulation.
They teach the child not to pay attention to their nose at all.
So what happens when they fall in the water unexpectedly — even just into the shallow end — and they’re not wearing the mask or nose clip?
Panic. Inhalation. And a very real risk of water being aspirated into the lungs.
My Advice
If your child is learning to swim:
Start without a nose clip or nose-covering mask. Let them develop a natural breathing rhythm.
Celebrate small steps. Just dipping the nose in and blowing bubbles is progress.
Practice gently and regularly. Over time, the fear fades and the reflexes grow.
Use goggles that leave the nose uncovered. So your child can build the ability to manage nose breathing on their own.
Swimming is not just about strokes — it’s about body awareness, breath control, and calm confidence. Let’s give children the chance to develop those skills, starting with the nose.
In this episode, we break down the breaststroke kick into clear, beginner-friendly steps you can practice on land — with or without water access.
You’ll learn:
How to position your body for optimal leg movement
What each stage of the kick should look and feel like
The rhythm and coordination that lead to smooth swimming
Whether you’re a swim coach, a parent, or a beginner swimmer, this guided session gives you all the cues and corrections you need to build muscle memory outside the pool.
Perfect for dryland prep before swim lessons
Also ideal for kids who need extra practice in a safe, supportive setting